Import resource data
The Add/Update sub-tab lets you import new or updated resource and item records.
| Note: If you are importing updated resource and item records that were exported from this installation of Destiny, use the Update Only sub-tab. |
You can import records into Destiny in one of two ways:
- Download the Resource Import Converter from Destiny to convert a CSV file to an XML file that you can then import into Destiny.
- Import resource data in a CSV or XLSX file directly into Destiny Back Office for one resource type at a time, without needing to convert the data.
Before you begin
Make sure you have already created or imported the resource templates that define the contents of the incoming records. Destiny skips any incoming records that do not have existing templates.
Import new and updated resources
To import the XML file:
- Log in to Destiny as a district-level user with the Manage Resources for the District permission or at the site with the Import resources/items permission.
- If logging in at the district, based on how Destiny is set up, do one of the following:
- Select
 > District Back Office.
 - From the top-right corner, click District.
- Select
- Select Catalog > Import Resources > Add/Update sub-tab.
- In the Resource Matching section, select if you want Destiny to skip incoming resources that match an existing resource, or overwrite the existing resource.
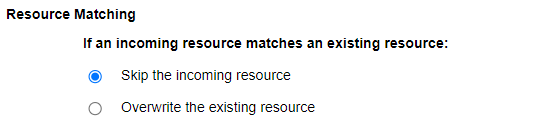
Note: It is recommended to select Skip the incoming resource to avoid making changes to existing data. - Choose one of the following options in the Item Matching section:
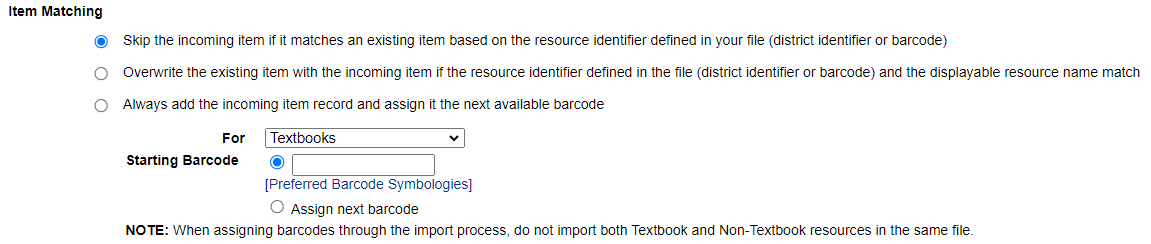
Select... If... Skip the incoming item if it matches an existing item based on the resource identifier defined in your file (district identifier or barcode) The file contains barcode numbers. Overwrite the existing item with the incoming item if the resource identifier defined in the file (district identifier or barcode) and the displayable resource name match You are updating resources in Destiny with information from your data file, such as adding serial numbers to items. Always add the incoming item record and assign it the next available barcode Your file does not contain barcodes. You can decide whether to have Destiny assign barcodes to the imported resource items, or to enter a starting barcode. - If importing from the site, use the For drop-down to choose if the file is for Resources (not Textbooks) or Textbooks.
- If importing at the site and you selected Always add the incoming items, select the method for assigning the barcode numbers:
- To determine the starting number yourself, select Starting Barcode, and then enter a number.
- To allow Destiny to find and use the next available barcode number, select Assign next barcode.
- Click Choose File (or Browse, depending on your browser), and then find the XML
- If importing from an XLSX or CSV file, select the resource type from the Destination Resource Type drop-down. Then, click Map Fields.

- By default, the Job Summary lists only errors and warnings. If you want a complete listing of the resources and items imported, deselect the Limit the Job Summary details… checkbox.
- To check the results before importing, click Preview.
Note: The Preview function reads the incoming records, compares them to the existing records, and generates a Job Summary – but does not actually import the records. After the preview, you can look over the report and decide whether your import settings need any adjustments. - To begin the import, click Import. The Job Manager page appears.
- Click Refresh List, as needed, to update the status of the Job Summary. Once the job is completed, click View to review it.
|
note: If you are updating existing resource items, the import does not replace existing information in the following fields: Resource Type, Condition, and Status. |
Additional Information
Invalid Records
Invalid Records
Destiny skips invalid records.
To be considered valid, a resource record must include the following:
- Data in at least one of the required fields that make up its Displayable Name.
- Data in the Template field that is the fully qualified resource type from your resource template hierarchy.
For example:
<Template>
<Computers|Desktop|Library|Search stations>
</Template>
A valid item record must include the following:
- A unique barcode number.
- A Short Site Name that exists in the district.
If the item record includes a District Identifier, it must be unique, or Destiny skips the record.
Any license or media item records must be of a resource type that is designated as software.
Any items that are not license or media items cannot be of a resource type designated as software.
Incomplete Records
If a resource or item record is incomplete, Destiny imports the record if it has the two required fields (above).
If there is no incoming Status, it is set to Available.
If there is no incoming Condition, it is set to Usable.
If there is no incoming Home Location, Custodian, Department, or Funding Source, it is set to Undefined.
It also adds a message to the Job Summary when encountering the following conditions:
- A record is missing one or more required fields.
- A record has fields that do not exist in the template.
- A record has data that does not match the data type defined in the template.
- A record contains a Department, Funding Source, Home Location, or Custodian that did not exist.
- A record has an unknown status, or a status of Checked Out or In Transit. (The status is set to Available.) If you chose to replace existing item records, the status does not change.
After the import, you need to review the Job Summary, and edit these records.
Job Summary
The Job Summary for an import or a preview includes the following information:
- Whether the job was an import or a preview
- The number of records read
- The numbers of resources and items that were (or would be) added, skipped, or replaced
- The number of errors that occurred during the import
- A summary of the errors and warnings encountered during your import
- The name of any resources that were (or would be) skipped, and the reason
- The barcode number of any items that were (or would be) skipped
If you deselected the Limit the Job Summary details…
checkbox, the Job Summary also includes a complete list of the resources and items that were imported.
The Job Summary provides links to edit any records that have incomplete information.
Preview and Job Summary
When you choose to preview an import and then perform an actual import, the numbers in the two job summaries might be slightly different. This is because of the matching process and the state of the database.
Preview compares each incoming record with those in the database. It determines whether the incoming record matches one already in the database. If it does not find a match, the Job Summary reports a resource added. If it does find a match, the Job Summary reports the resource skipped or replaced (depending on the settings chosen). During Preview, the database does not change.
Import first compares each incoming record with those in the database. It determines whether the incoming record matches one already in the database. If it does not find a match, it adds the record to the database. If it does find a match, it skips or replaces it (depending on the settings chosen). During Import, the database changes with every added record.
Since Preview does not change the database and Import does, the numbers reported in the job summaries might be slightly different.
|
Example: In the import file, there are two records of the same resource, A and B. Import would add A to the database. When Import encounters B, it would recognize it as a match to A and skip or replace it. Preview would import record A and, not seeing A in the database, would import B as well. |
The difference between Preview and Import also applies to items. Duplicate barcodes can cause similar differences in the number of items replaced or skipped.