Add a resource description record (Resource Manager)
|
Important: If a district has any Destiny Textbook Manager installations, all textbook-related features are hidden in Resource Manager. For example, the Textbooks template will not appear in Resource Manager. |
Resource description records are like product description tags found on the face of a store shelf. They include general information about a resource, such as manufacturer, model, and brand.
Search for and add a resource
A district resource user, or site user with the Manage resource descriptions - Add/duplicate permission, can add a resource description record. Keep in mind, the more people that add description records, the more chance there will be of record duplication.
It is best to have a limited number of people at the district designated to add description records.
To search for and add a resource:
- Select Catalog > Add Resource > Check Sources sub-tab.
- From the Find all drop-down, select the resource type.
- Use the Where Resource Name drop-down to select one of the following:
- Contains: Performs a keyword search for one or more words that are part of the Resource Displayable Name. This is the broadest search.
- Starts With: Searches for resources that begin with the letters or words you enter. Select this option only when you know the resource’s exact name.
- Type your search term.
Note: When searching for textbook resources, Follett recommends you search by ISBN to ensure you get an exact match.
- Click Go.

Note: Because Destiny searches both the district database and the T2 online database (for textbooks), you might see multiple search results. Search results with
 are already in your district’s catalog. Use these records to avoid creating duplicate description records and just add items to the record.
When adding a textbook title that is not in your district's database, manually add it or use a T2 record. Click Details next to the record. If you are ready to add the items, click Add Item; otherwise, click Save. - If no record exists, the Add Resource page appears. In the Resource Type drop-down, confirm the correct resource type is shown.
- Complete all required fields and as many other fields as possible.
Note: Reports are more accurate and useful if most fields are completed.
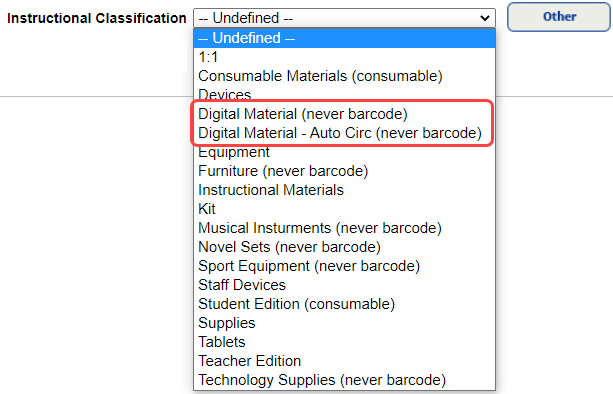
- If this is a digital resource, use the Instructional Classification drop-down to select Digital Material (never barcode) or Digital Material – Auto Circulate (never barcode).
Note: Instructional Classification encompasses resources with barcodes, resources that should never be barcoded, and consumables. (Never barcode) prevents anyone from assigning barcodes to the items and prevents Destiny from importing or uploading items with barcode numbers. You cannot select this option if this resource has any existing barcoded items. For consumables, barcodes cannot be assigned. Destiny only accepts counts for these items.
- For eTextbooks, use the Material Type drop-down to select Electronic Book (eBook). Digital materials that are not eTextbooks can have any material type.
- If you have container items, such as mobile tablet carts with laptops, select Includes other items. This allows all tablets associated with that cart to be automatically checked in or out, in one transaction.
Note: Only district users can designate a new resource as 'includes other items'. Software, textbooks, and non-barcoded items (such as consumables) cannot be designated as container items.
- Click Save.
- If you selected the Includes other items checkbox, click Yes to confirm that you want the resource to include other items. The Resource Details tab appears.