Bibliography
The Bibliography report lets you create reading and reference lists. Use it to promote certain areas of your collection, specific topics of interest, recently received materials, or popular authors and series. Create the report based on a range of titles, authors, subjects, call numbers, dates added, the titles in a Resource List, or a barcode list or file.
After setting up the report, save or run it. If the report setup is saved, it appears on the Saved Reports sub-tab. From there, you can add as a favorite, run, edit, duplicate, or delete it. Each time the report is run, the results reflect the current contents of your collection.
To create a bibliography report:
- Select Reports > Library Reports.
- Under Catalog -- Titles & Copies, click Bibliography.
- If you run the report at the district, use the For drop-down to choose a specific site.
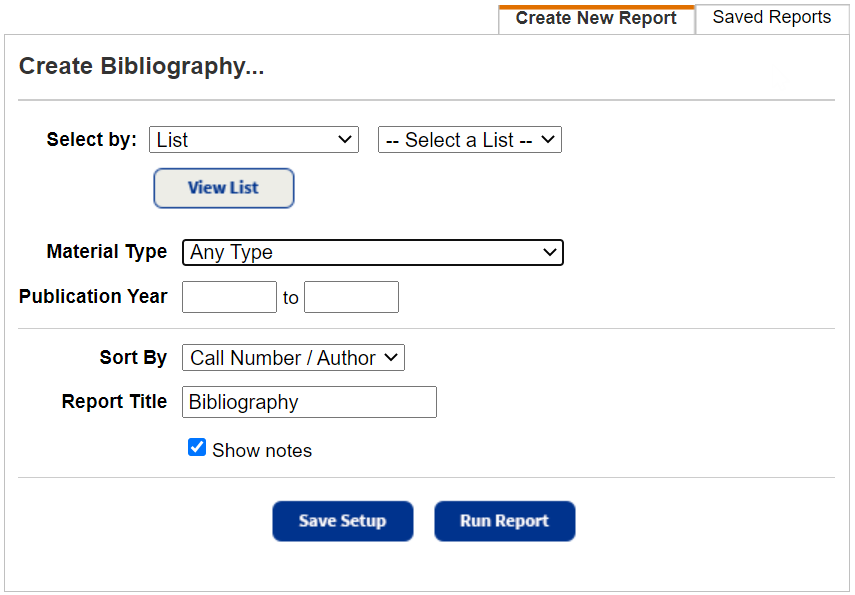
- Use the Select by drop-down to choose how to identify titles to include in the bibliography.
-
List: If you have multiple Resource Lists, select the one for the report. To review the List contents, click View List.
-
Title, Author, Subject, or Call Number: Do one of the following to specify the range:
- Leave both fields blank to include all titles.
- Leave the From field blank, and enter a name or number in the to field. The report includes all those up to and including the data in the to field.
- Enter a name or number in the From field, and leave the to field blank. The report includes that data and all after it.
- Enter the same name or number in both fields. The bibliography is limited to that one title, author, subject, or call number.
- If you chose Subject, select the Include site-specific subjects checkbox to include titles with site-specific subjects.
Notes:
-
Destiny does not support the use of wildcards (?, *) in ranges.
-
The site-specific subjects option is not available at the district.
-
Barcode List: Either create a list, or browse to an existing file.
- To create a list, place the cursor in the Create a barcode list field and scan the barcodes, or type them and click Add.
- To remove a barcode number from the list, select it and click Remove.
Note: If you save a report based on a barcode file, Destiny stores the file when you save the report. Destiny does not reload the file each time you run the saved report. - To select an existing file, click Browse (or Choose File, depending on your browser).
- To create a list, place the cursor in the Create a barcode list field and scan the barcodes, or type them and click Add.
-
Date Copies Added, Date Title Added, or Date Title Updated: Specify the dates.
- From the first drop-down, select after, on, or before the date.
- Enter a date, or click
 to use the calendar.
Note: When you run a saved report with a date limiter, Destiny displays the saved date and prompts you to change it. - To limit by a material type, select it from the Material Type drop-down.
- To limit by publication years, enter the years in the Publication Year fields.
Note: You can limit the publication year to one year or a range.
Leave both fields blank – the report includes all publication dates.
Leave the first field blank, and enter a date in the to field – the report includes all those up to and including the date entered.
Enter a date in the first field, and leave the to field blank – the report includes that date and all those after it.
Enter the same date in both fields – the report is limited to that one date.
- Use the Sort by drop-down to select how you want the bibliography sorted.
- Enter a Title, up to 50 characters, for the bibliography.
- To include note, click Show notes.
- To generate the report now, click Run Report.
- To save the setup, click Save Setup and enter a unique name.
Work with Saved Bibliography Reports
If you save the report setup, you may need to pay attention to some of the options when you rerun the report. These depend on the selection you made in the Select by drop-down when the report was created:
- Resource List:
- While editing the report setup, other users can view your Resource List.
- If the Resource List is deleted, you cannot run the report until another Resource List is selected.
- Date: When you run a saved report with a date limiter, Destiny displays the saved date and reminds you to change it.
- Barcode List: If you create a report based on a barcode file, Destiny stores the file when you save the report. Destiny does not reload the file each time you run. To run a Saved Report based on the updated contents of a barcode file, edit the Saved Report and select the barcode file again.
Once you save the report setup, it appears on the Saved Reports sub-tab, and you have the following options:
- Add to Favorites: Click the Add to Favorites icon,
 , to add the report to your My Favorites page. Reports already in your My Favorites list are designated with a favorite icon,
  .
. - Run: Each time you run the report, the results reflect the current contents of your collection. Other users with permission to run reports can also run your Saved Reports.
- Edit: When you edit a saved report setup and re-save it (even with a different name), the original report setup is overwritten.
- Duplicate: To make it easier to create a new Saved Report, you can choose to duplicate an existing Saved Report. This is a quick way to create one or more additional Saved Reports based on the configuration of the original Saved Reports.
- Delete: When you delete a Saved Report, previous reports from the Saved Report are not deleted from the Report Manager.
Bibliography Information
The bibliography title appears at the top, followed by the sorting method, and any material type limitation.
For each included title, the bibliography includes the following information:
- Call Number
- Author (1XX tag, all subfields)
- Title (245_a and _b) (underlined)
- Edition (250_a)
- Publishing information (place, publisher, and date)(260_a, _b, and _c)
- Notes, if you selected the checkbox (any 505_a, 511_a, and 520_a tags)