Checked In Materials Report
The Checked In Materials report helps you identify and send notices to patrons confirming that materials were checked in. You can also see materials checked in by location/department. Select the timeframe to report on, and other details.
To generate the report, users need the Generate patron reports permission, and at least one of the following permissions:
- Generate library reports
- Generate resource reports
- Generate textbook reports
To set up the Checked In Materials report:
- Select Reports > Library Reports, Resource Reports,
- Under Circulation, select Checked In Materials.
Step 1: Format
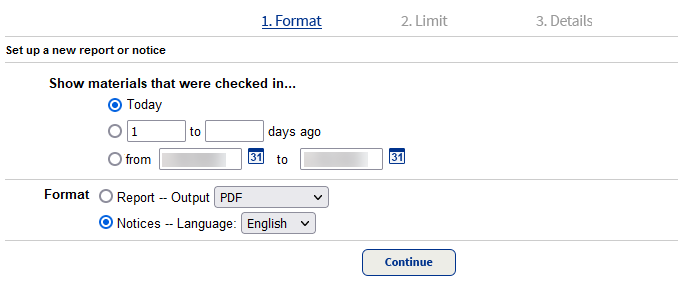
- Select the dates of transactions to include in the report:
- Today
- A specific range of recent days (such as 2-5 days ago)
- A specific date range
- Choose a format:
- Report (PDF or Excel): This is a good option if you want to have a report of all checked in materials.
- Notices (Choose English, French, or Spanish): Choose this option if you want to mail or email students and/or parents to confirm material was checked in.
- Click Continue.
Step 2: Limit
In the Limit the results to... section, choose either My Locations/Departments
My Locations/Departments
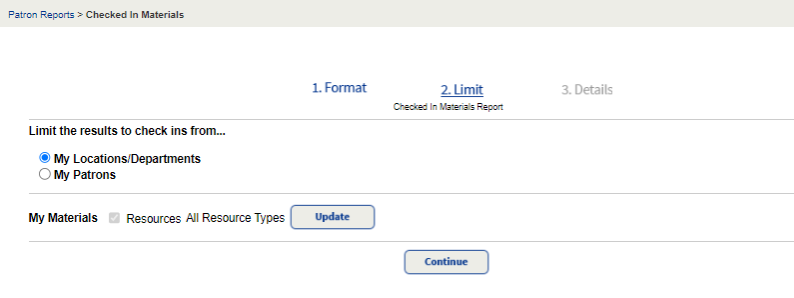
- To exclude specific resource circulation types, click Update, and then deselect the appropriate checkboxes. Click Save.
- Click Continue.
My Patrons
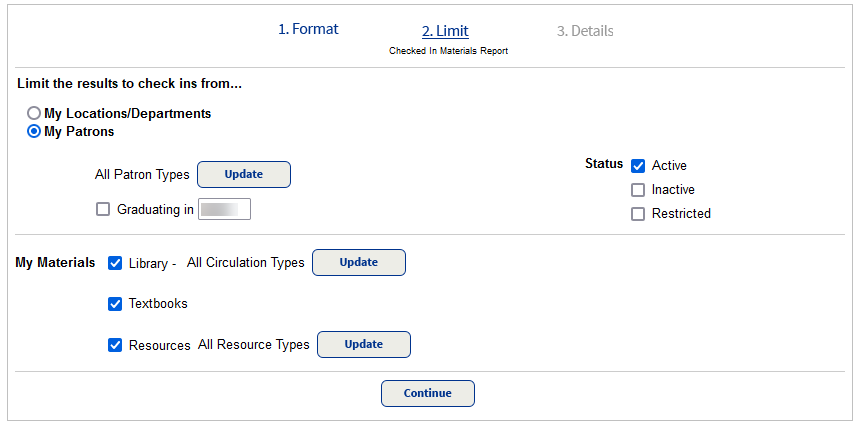
- By default, the report includes all active patrons. You can limit patrons by the following:
- To exclude specific patron types, click Update, and then deselect the appropriate checkboxes. Click Save.
- To include only a specific graduating class, select Graduating in, and then type the year.
- To include patrons with an Inactive or Restricted status, select accordingly.
- By default, the report includes materials with any circulation type. You can limit materials by the following:
- To exclude specific library circulation types, click Update, and then deselect the appropriate checkboxes. Click Save.
- To exclude specific resource circulation types, click Update, and then deselect the appropriate checkboxes. Click Save.
- If your school uses DestinyTextbook Manager, choose if you want to include textbooks and related fines.
- Click Continue.
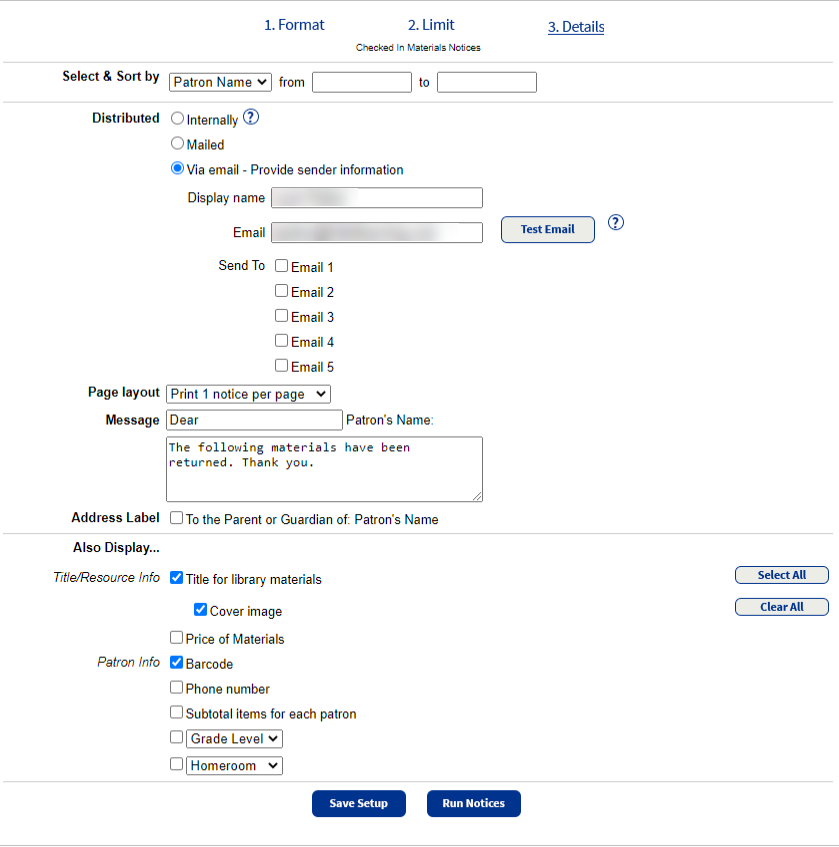
Step 3: Details
The instructions for this step vary depending on the format you selected in Step 1.
If you chose Report:

- In the Select & Sort by section, select a method for identifying patrons to include
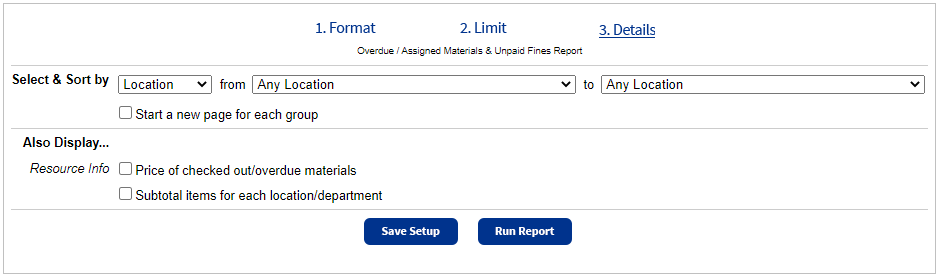
- In the from and to fields, do one of the following:
- To include all patrons,
Note: If you selected Homeroom, select Any Homeroom from both drop-downs to include all.
- To limit the report to one name or number (such as a specific patron or all 8th graders), type or select the same name or number in both fields. For example, you might choose to run the report for one patron (to Smith from Smith) or one grade level (to 8 from 8)
- If you leave the from field blank and type a name or number in the to field, it includes all those items up to and including the name or number in that field.
- If you type a name or number in the from field and leave the to field blank, it includes that name or number, and all those after it.
- To include all patrons,
- If you chose to run a PDF report, a Start a new page... checkbox appears. If you want to start a new page after every group in the report, select it. Groups are determined by the information you selected in the Select & Sort by section.
- From the Also Display... section, select or deselect the information to include in the report.
If you chose Notices:
- In the Select & Sort by section, select a method for identifying patrons to include from the drop-down.
- In the from and to fields, do one of the following:
- To include all patrons, leave both fields blank.
Note: If you selected Homeroom, select Any Homeroom from both drop-downs to include all.
- To limit the report to one name or number (such as a specific patron or all 8th graders), type or select the same name or number in both fields. For example, you might choose to run the report for one patron (to Smith from Smith) or one grade level (to 8 from 8).
- If you leave the from field blank and type a name or number in the to field, it includes all those up to and including the name or number in that field.
- If you type a name or number in the from field and leave the to field blank, it includes that name or number and all those after it.
- To include all patrons, leave both fields blank.
- Select how you want notices distributed: internally, mailed (includes address), or email.
- If you selected Via email:
- In the Display name field, verify or change the name you want to appear as the sender.
- In the Email field, verify or change the email address you want to appear as the email sender.
- From the Send To options, select one or more checkboxes to identify the email addresses you want to send notices to. The options correspond to patron record fields, which can include up to five email addresses.
- To send yourself a test email, click Test Email.
- If you selected internally or mailed in the Distributed section, in the Page layout drop-down, select the number of notices to print on each page.
- In the Message fields, you can customize the salutation before the patron's name and the text of the message.
- To include the text, "To the Parent or Guardian of:" with the patron's name, select the Address Label checkbox.
- From the Also Display... section, select or deselect the title or patron info to include. You can also select to include a thumbnail of cover images.
Step 4: Save & Run
Now that you have the report set up, you are ready to save and/or run it.
To run a report or notices that you do not want to save for later use:
- Click Run Notices. Report Manager appears and displays your report at the top of the list. The status automatically updates.
- Click the View link to see the report, notices, or status of the email notices.
To save the report or notices to run again, or schedule it to run automatically:
- Click Save Setup or Run Report.
- If you chose Save Setup:
- In the Save As field, type a name for the report or notices.
- From the Schedule Report drop-down, select Do Not Schedule if you do not want the report to run automatically. To schedule the report to run on a daily or weekly basis, select accordingly, and then select the day and/or time you want them to run.
Note: If you do not want the report or notices to run on closed days, select the Do not run on closed days (Closed: Sunday, Saturday) checkbox.
- If you selected Run Report, Report Manager displays your report at the top of the list. The status automatically updates. Click the View link to see the report, notices, or status of the email notices.
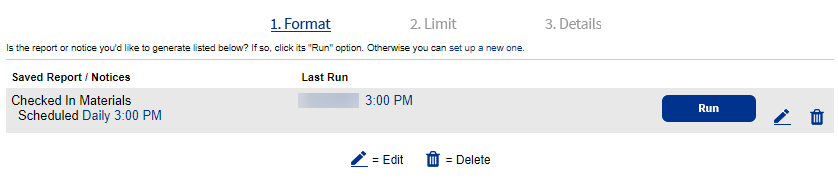
The saved report or notice setup appears on the Format page, in the Saved Report/Notices list at the top.
Frequently Asked Questions
How do I set up emails?
For the email options to appear, you will need to have a mail server configured.
In addition, your patrons or homeroom supervisors must have a valid email address (Email 1 or Email 2, or both) in their records.
If any of them do not, you can print the skipped or failed notices for patrons without valid email addresses by clicking the Skipped/Failed Notices link in the job summary.
Skipped indicates that the email address was missing or defective.
Your Destiny Administrator can set up an email server under SMTP Settings on the District Options sub-tab.
You can create homerooms and assign supervisors to them on the Site Administration sub-tab of Site Configuration on the Admin tab.
Can I rerun a customized report?
Custom reports appear on the Format page in the Saved Report / Notices list.
- To change the day or time that it runs, or to stop it from running automatically, click the link next to Scheduled.
- To open the latest report or notice, click the date under Last Run.
- To add the saved report or notice to your My Favorites list, click Add to Favorites. Saved reports and notices already in your My Favorites list have a Favorite icon.
- To run, edit, or delete the saved report or notice, click the appropriate icon.
How does limiting help me?
Limiting the information on a report helps you extract just the information you need – certain transactions, patrons, and materials. Keep in mind who needs the information and what they need to know.
For example, to limit the report or notices to patrons in a specific grade, select the Graduating in checkbox on the Limit page, and enter the desired year.
How does sorting help me?
Sorting the information on the report and creating page breaks between groups lets you produce reports in batches, for specific recipients.
For example, sort your Checked In Materials reports (and select page breaks) by Homeroom for easy distribution to homeroom teachers.
To include all homerooms, leave the fields empty.
To run notices for only homerooms A through G, select Homeroom from the list, and enter a and g in the fields.
Can I generate notices in Spanish or French?
If you have chosen to allow guests and patrons the option of viewing Catalog pages in Spanish and/or French, you can choose to generate notices in that language.
On the Format page, select the language for the notices next to Notices.
Remember that Destiny does not translate the message you enter on the Details page or any information from the database.