Run the Current Checkouts/Fines report
The Current Checkouts/Fines report helps you identify and send notices to students with checkouts, overdues, and/or fines. You can report information as broadly or as narrowly as you want.
To generate the report, users need the Generate patron reports permission, and at least one of the following permissions:
- Generate library collection reports
- Generate resource collection reports
- Generate textbook collection reports
|
Important: Textbooks checked out by ISBN appear on this report. |
If you have Destiny Resource Manager, you can notify custodians of the resources assigned to them.
To set up the Current Checkouts/Fines report:
- Select Reports > Library Reports, Resource Reports,
- Under Circulation, select Current Checkouts/Fines.
Step 1: Format
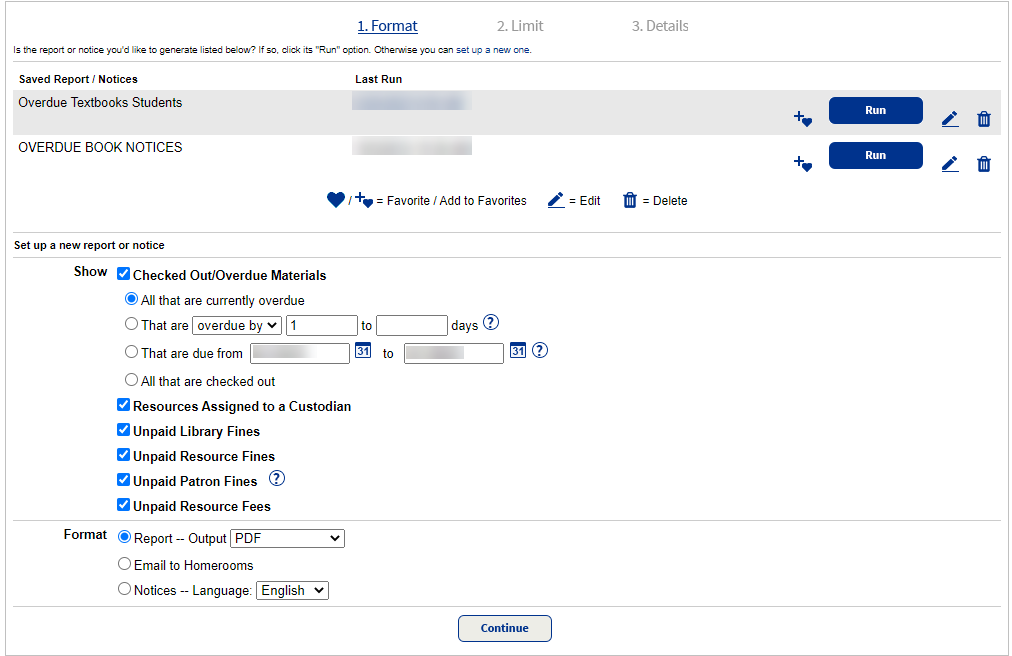
- Select the types of transactions to include in the report:
Note: The Show > Checked Out/Overdue Materials option is selected by default.
- All that are currently overdue
- Those overdue by a specific range of days (such as 2–5 days) or due in a specific number of days (such as 2 days)
- Those due during a specific date range
- All checked out materials
- Resources assigned to a custodian
Note: Destiny Resource Manager only. - Unpaid fines
- Unpaid resource fees
- Choose a format:
- Report (PDF or Excel): This is a good option if you want to have a report of all overdues/fines for your school to refer to or a list of materials that are due soon.
Note: If you choose to report on Locations/Departments in Step 2, the only format you can use is Report.
- Email to Homerooms: Send an email summary to each homeroom teacher who has a student(s) with overdue materials or fines, or as a reminder of materials that are due soon.
Note: This option requires your Destiny Administrator to set up an outgoing mail server (Setup > District Options sub-tab) and your patron records to contain homeroom information.
- Notices (Choose English, French, or Spanish): Choose this option if you want to mail or email students and/or parents to notify them of overdues, fines, or checkouts that are due soon.
- Report (PDF or Excel): This is a good option if you want to have a report of all overdues/fines for your school to refer to or a list of materials that are due soon.
- Click Continue.
Step 2: Limit
In the Limit the results to... section, choose either My Locations/Departments (Resource Manager only) or My Patrons (default). Based on your choice, the screen changes accordingly.
My Locations/Departments
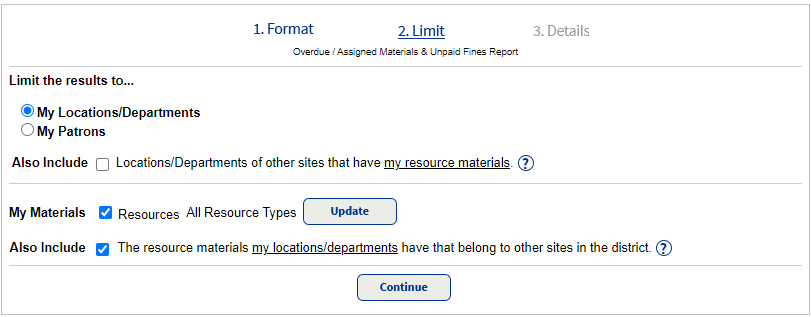
- If you allow other sites in the district to check out your resources, choose if you want to Also Include those locations/departments.
- To exclude specific resource types, click Update, and then deselect the appropriate checkboxes. Click Save.
Note: You can only access the resources types you have permission to report on. For details, see Resource Groups.
- If locations/departments at your site can check out resources from other schools in the district, choose if you want to Also Include those resources.
- Click Continue.
My Patrons
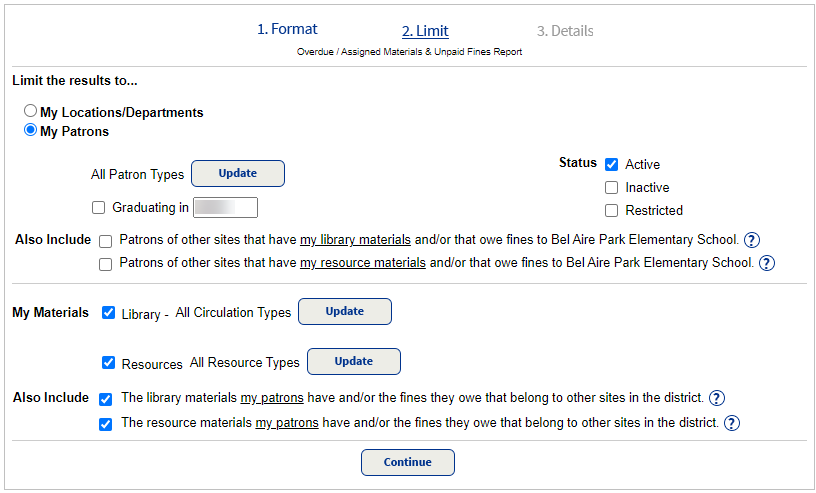
- By default, the report includes all active patrons. You can limit patrons by the following:
- To exclude specific patron types, click Update, and then deselect the appropriate checkboxes. Click Save.
- To include only a specific graduating class, select Graduating in, and then type the year.
- If you allow students from other schools in the district to check out your materials, choose if you want to Also Include those patrons.
- To include patrons with an Inactive or Restricted status, select accordingly.
- By default, the report includes materials with any circulation type. You can limit materials by the following:
- To exclude specific library circulation types, click Update, and then deselect the appropriate checkboxes. Click Save.
- To exclude specific resource circulation types, click Update, and then deselect the appropriate checkboxes. Click Save.
Note: You can only access the resources types you have permission to view. For details, see Resource Groups.
- If your school uses Destiny Textbook Manager, choose if you want to include textbooks and related fines.
- If students at your school can check out materials from other schools in the district, choose if you want to Also Include those materials.
- Click Continue.
Step 3: Details
The instructions for this step vary depending on the format you selected in Step 1.
If you chose Report:

- In the Select & Sort by section, select a method for identifying patrons to include
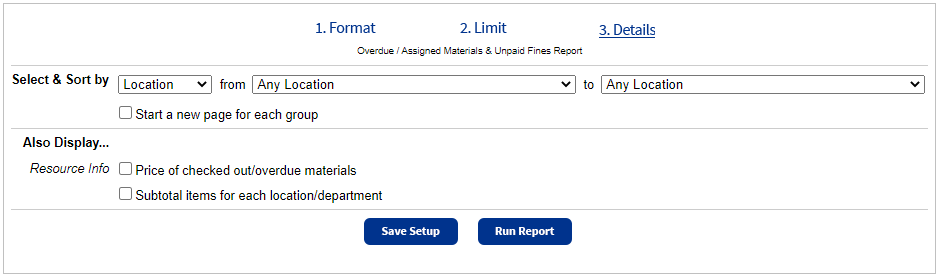
- In the from and to fields, do one of the following:
- To include all patrons,
Note: If you selected Homeroom, select Any Homeroom from both drop-downs to include all.
- To limit the report to one name or number (such as a specific patron or all 8th graders), type or select the same name or number in both fields. For example, you might choose to run the report for one patron (to Smith from Smith) or one grade level (to 8 from 8)
- If you leave the from field blank and type a name or number in the to field, it includes all those items up to and including the name or number in that field.
- If you type a name or number in the from field and leave the to field blank, it includes that name or number, and all those after it.
- To include all patrons,
- If you chose to run a PDF report, a Start a new page... checkbox appears. If you want to start a new page after every group in the report, select it. Groups are determined by the information you selected in the Select & Sort by section.
- From the Also Display... section, select or deselect the information to include in the report.
If you chose 'Email to Homerooms':
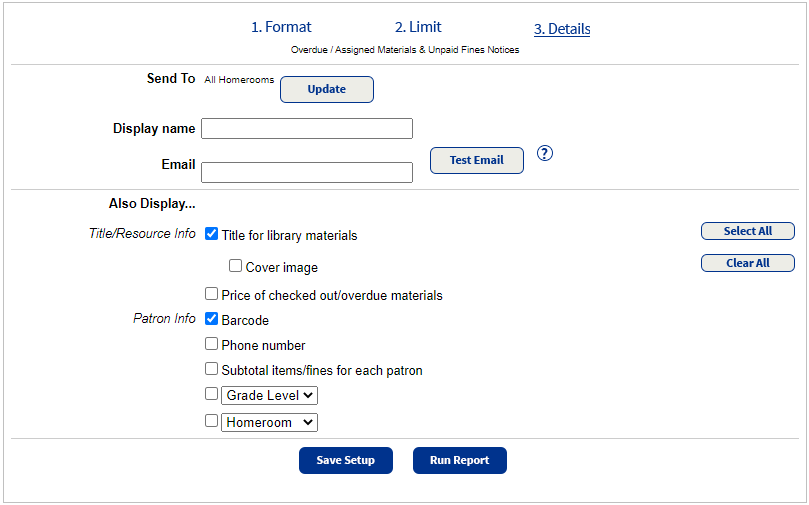
- By default, all homerooms are included. To exclude a homeroom, click Update. Deselect homerooms accordingly, and then click Save.
- In the Display name field, verify or change the name and email address you want to appear as the email sender.
- From the Also Display... section, select or deselect the title and patron info to include in the report. To include a thumbnail of cover images, select the Cover image checkbox.
If you chose Notices:
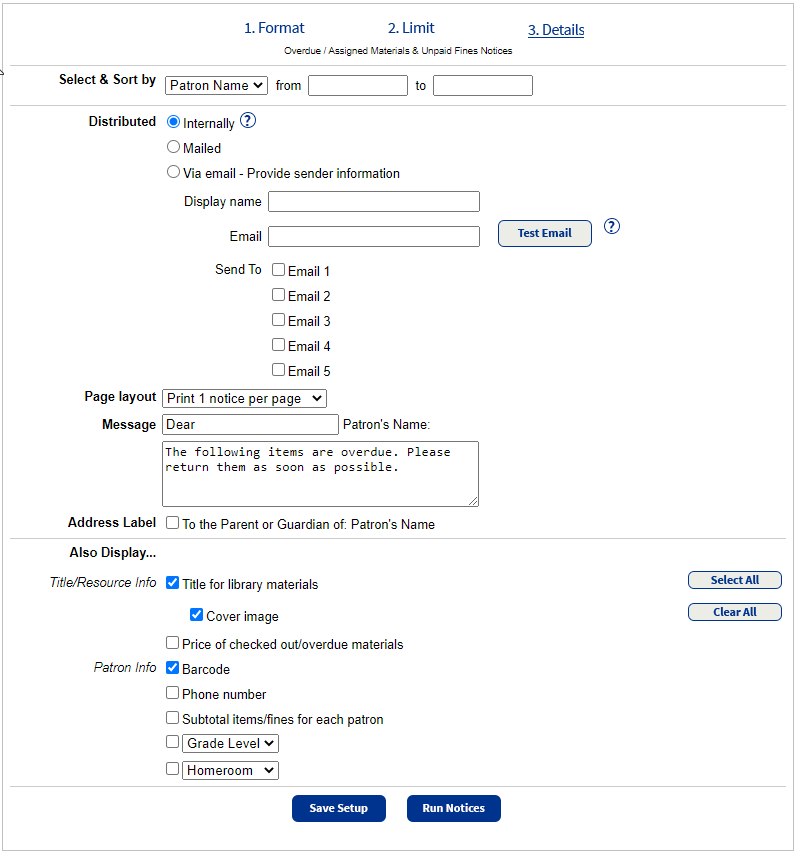
- In the Select & Sort by section, select a method for identifying patrons to include from the drop-down.
- In the from and to fields, do one of the following:
- To include all patrons, leave both fields blank.
Note: If you selected Homeroom, select Any Homeroom from both drop-downs to include all.
- To limit the report to one name or number (such as a specific patron or all 8th graders), type or select the same name or number in both fields. For example, you might choose to run the report for one patron (to Smith from Smith) or one grade level (to 8 from 8).
- If you leave the from field blank and type a name or number in the to field, it includes all those up to and including the name or number in that field.
- If you type a name or number in the from field and leave the to field blank, it includes that name or number and all those after it.
- To include all patrons, leave both fields blank.
- Select how you want notices distributed: internally, mailed (includes address), or email.
- If you selected Via email:
- In the Display name field, verify or change the name you want to appear as the sender's email address.
- In the Email field, verify or change the email address you want to appear as the email sender.
- From the Send To options, select one or more checkboxes to identify the email addresses you want to send notices to. The options correspond to patron record fields, which can include up to five email addresses.
- To send yourself a test email, click Test Email.
- If you selected internally or mailed in the Distributed section, in the Page layout drop-down, select the number of notices to print on each page.
- In the Message fields, you can customize the salutation before the patron's name and the text of the message.
- To include the text, "To the Parent or Guardian of:" with the patron's name, select the Address Label checkbox.
- From the Also Display... section, select or deselect the title or patron info to include. You can also select to include a thumbnail of cover images.
Step 4: Save & Run
Now that you have the report set up, you are ready to save and/or run it.
To run a report or notices that you do not want to save for later use:
- Click Run Notices. Report Manager appears and displays your report at the top of the list. The status automatically updates.
- Click the View link to see the report, notices, or status of the email notices.
To save the report or notices to run again, or schedule it to run automatically:
- Click Save Setup or Run Report.
- If you chose Save Setup:
- In the Save As field, type a name for the report or notices.
- From the Schedule Report drop-down, select Do Not Schedule if you do not want the report to run automatically. To schedule the report to run on a daily or weekly basis, select accordingly, and then select the day and/or time you want them to run.
Note: If you do not want the report or notices to run on closed days, select the Do not run on closed days (Closed: Sunday, Saturday) checkbox.
- If you selected Run Report, Report Manager displays your report at the top of the list. The status automatically updates. Click the View link to see the report, notices, or status of the email notices.
The saved report or notice setup appears on the Format page, in the Saved Report/Notices list at the top.

Frequently asked questions
For the email options to appear, you will need to have a mail server configured.
In addition, your patrons or homeroom supervisors must have a valid email address (Email 1 or Email 2, or both) in their records.
If any of them do not, you can print the skipped or failed notices for patrons without valid email addresses by clicking the Skipped/Failed Notices link in the job summary.
Skipped indicates that the email address was missing or defective.
Your Destiny Administrator can set up an email server under SMTP Settings on the District Options sub-tab.
You can create homerooms and assign supervisors to them on the Site Administration sub-tab of Site Configuration on the Admin tab.
Emailed notices display the subject, Checked Out/Overdue/Fines, and contain the checkout/overdue information in the body of the email message.
Homeroom emails display the subject <Homeroom>: Checked Out/Overdue/Fines, and contain the checkout/overdue information in a PDF attachment.
Custom reports appear on the Format page in the Saved Report / Notices list.
- To change the day or time that it runs, or to stop it from running automatically, click the link next to Scheduled.
- To open the latest report or notice, click the date under Last Run.
- To add the saved report or notice to your My Favorites list, click Add to Favorites. Saved reports and notices already in your My Favorites list have a Favorite icon.
- To run, edit, or delete the saved report or notice, click the appropriate icon.
For example, you can create a list of customized reports and notices, such as these:
- Checkout lists for first grade teachers
- Overdue lists for homeroom teachers
- Fine notices for items more than 5 days overdue - students A-L
- Bill notices for books presumed lost - students A-Z
- Resource lists for teachers with custody of resources
There are several reports you can create with Current Checkouts/Fines. For instance, depending on how you format, limit, and sort the report, you can generate lists like the following:
- Patrons with overdue copies and outstanding fines, grouped by homeroom
- Graduating patrons with any checkouts, alphabetically by name
- Only patrons with outstanding fines or unpaid fees
There are several notices you can create with the report builder. For instance, depending on how you limit the patrons and materials, and word the notice, you can generate any of the following:
- Overdue notices
- Fine notices
- Bills for books presumed lost
You can create and save several types of notices, each with their own appropriate message.
For each patron, a report or homeroom email includes the following information:
Header
- Title
- School name
- Patron information
- Full name
- Phone number (if selected)
- Barcode number (if selected)
- One or more optional fields: Grade Level, Homeroom, User Defined 1, User Defined 2 (if selected)
Checkout information
For each overdue copy:
- Due date
- Call number (library materials only)
- Barcode number [District Identifier]
- Title (if selected)
- Copy price (if selected)
- Estimated fine (if charged)
For each copy checked out (if included):
- Materials type
- Due date
- Call number (library materials only)
- Barcode number [District Identifier]
- Title (if selected)
- Total checkouts
For each outstanding fine (if included):
- Reason for fine
- Date fine assessed
- Call number (library materials only)
- Barcode number [District Identifier]
- Title/Description (if selected)
- Replacement or purchase price
- Fine amount
- Total fine amount
For unpaid resource fees (if included):
- Patron name and barcode
- Unpaid fee name
- Date assigned
- Amount due
For assigned resources (if included):
- Date due (if any)
- Item status
- Barcode number [District Identifier]
- Resource description (and component if needed)
For a location/department:
- Location/Department name
- Resource type and description
- Due date
- Custodian name, if assigned
- Item barcode [District Identifier]
- Site name, if including other sites that check out your resources, or locations/departments at your site can check out resources from other schools.
Each notice includes the following information:
Header
- School name
- School address (if Mailed is selected)
- Date generated
- Patron's full name
- Patron's mailing address (if Mailed selected)
- One or both optional fields: Grade Level, Homeroom, User Defined 1, User Defined 2 (if selected)
- Phone number (if selected)
- Barcode number (if selected)
- Notice title
- Salutation
- Message
Checkout information
For each overdue copy:
- Due date
- Call number (library materials only)
- Barcode number [District Identifier]
- Title (if selected)
- Copy price (if selected)
- Estimated fine (if charged)
For each copy checked out (if included):
- Due date
- Call number (library materials only)
- Barcode number [District Identifier]
- Title (if selected)
- Copy price (if selected)
- Total checkouts
For each outstanding fine (if included):
- Date fine assessed
- Reason for fine
- Call number (library materials only)
- Barcode number [District Identifier]
- Title (if selected)
- Fine amount
- Total fine amount
For unpaid resource fees (if included):
- Patron name and barcode
- Unpaid fee name
- Date assigned
- Amount due
- Total amount due
For assigned resources (if included)
- Date due (if any)
- Item status
- Barcode number [District Identifier]
- Resource description (and component if needed)
- Total items assigned
Limiting the information on a report helps you extract just the information you need – certain transactions, patrons, and materials. Keep in mind who needs the information and what they need to know.
For example, to limit the report or notices to patrons in a specific grade, select the Graduating in checkbox on the Limit page, and enter the desired year.
When materials or textbooks have been overdue for a substantial period of time and you assume that the patrons will not be returning them, generate bill notices:
Limit the materials on the Format page to those overdue by 30 days, and select the format of Notices.
On the Details page, enter a bill message (for example, The following items are long overdue and assumed to be lost. Please pay the amount listed below as soon as possible.). Be sure to select the Price of checked out/overdue materials checkbox.
Sorting the information on the report and creating page breaks between groups lets you produce reports in batches, for specific recipients.
For example, sort your overdue reports (and select page breaks) by Homeroom for easy distribution to homeroom teachers.
To include all homerooms, leave the fields empty.
To run notices for only homerooms A through G, select Homeroom from the list, and enter a and g in the fields.
If you created a User-Defined field for library period, provide the 4th period teacher with a list of her students' checkouts. On the Format page, select All that are checked out. On the Details page, select Library period from the Select & Sort by
list, and enter 4th in the boxes.
If you have chosen to allow guests and patrons the option of viewing Catalog pages in Spanish and/or French, you can choose to generate notices in that language.
On the Format page, select the language for the notices next to Notices.
Destiny does not translate the message you enter on the Details page or any information from the database.