Pick List
(Resource Manager)
Depending on if you selected to choose items yourself or have Destiny choose items to be picked when you created the pick list, you will either need to scan items or verify you found all items.
Pick the items
In the To be picked section, you will see all the items to be picked, including the quantity needed, and the requester.
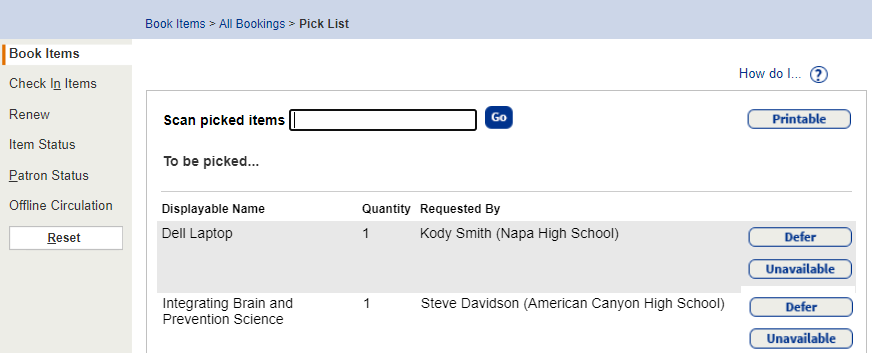
To create a list to retrieve items, click Printable. Once you have the items, do the following:
- In the Scan picked items field, scan or type the barcode of each item.
- If not all items are available to fulfill a request, defer or mark the request unavailable.
- If an item will be available soon, click Defer. The request returns to the Pending Requests section (select Circulation > Book Items, and then click All Bookings). You can add it to a future pick list.
- If you do not know when or if the item will available, click Unavailable. The request appears in the Unavailable Items section (select Circulation > Book Items, and then click All Bookings). Destiny sends the requesting patron a message that the item is unavailable.
- If items are unbarcoded, enter the quantity in the Quantity Picked field, and then click Pick.
- When you are done, click Booking Labels to generate the labels or Packing List to create a packing list for the items.
Destiny Chooses the Items
In the Pick List for <date> section, you will see the items to be picked, including the barcode and the requester.
If Destiny could not find an available item, Unavailable appears in the Barcode column and the request moves to the Unavailable Items section (select Circulation > Book Items, and then click All Bookings).
Destiny sends the requesting patron a message that the item is unavailable.
To create a list to retrieve items, click Printable. Once you have the items, do the following:
- If an item was not available but will be soon, click Defer to remove it from the pick list. The request returns to the Pending Requests section (select Circulation > Book Items, and then click All Bookings). You can add it to a future pick list.
- When you are done, click Booking Labels to generate the labels or Packing List to create a packing list for the items.
Once you have gathered all the copies on the pick list, you are ready to ship them or place them on the hold shelf for pickup.
Ship the items
- To ship all the items on a pick list, click Ship All. A confirmation message appears.
- To generate labels, select the Create Booking Labels checkbox.
- Click Yes.
Patron Pickup of Items
- Click Hold for Pick Up. A confirmation message appears.
- To generate labels, select the Create Booking Labels checkbox.
- Click Yes.
The requests move to the Patron Pickup section of the All Bookings page.
When the patron arrives to pick up the materials, click Picked up.
Clicking Ship All or Picked up causes Destiny to perform the following actions:
- Check out the items to the requesting patrons. The end date of the request is the due date.
- Change the Status of the copies from Available or On Hold to Checked Out.
- Remove the requests from the All Bookings page.
- Move any items marked Unavailable on the pick list to the Unavailable Items section (select Circulation > Book Items, and then click All Bookings). A message is sent to the patron informing them the item is currently unavailable.
- Generate a Booking Shipment job summary. Depending on your selections, it contains a packing list for each shipping destination and a booking label for each copy.
Print labels and lists
Destiny generates a job for each pick list.
When the Job Manager opens:
- Next to Booking Shipment or Booking Labels, click View.
- When the Report Manager opens, click View. The report opens in a browser.
- Do one of the following:
If you want to... Then... Download the label sheet Click . Print the labels - Position the label stock in your printer.
- Click .
- Set the print settings.
Important: Set to:
- Scale at 100%.
- Print on one side.
- Click Print.
The booking shipment includes the following:
- Total number of items in the pick list, items requested for pickup or shipped, and items unavailable
- Errors (if any)
- Item's description and barcode number
- Requesting patron's name and site
The packing lists are organized by zone (if selected). Each school has a separate page, containing the ship from and ship to sites, and the following for each patron receiving items:
- The patron's name, barcode number, and district ID (if defined)
- Each item's barcode number, resource description, and ship and return (due) dates.
Each booking label contains the following information:
- Item's barcode number, site the item is being shipped to, title, and barcode number
- Requesting patron's name, site, and zone.
- Booking's ship and return (due) dates
- Name of the advance booking site.
Any requests that cannot be filled are listed as Unavailable.