Access Levels and Permissions
Access levels regulate what users can see and do in Destiny. Each access level contains a set of permissions. Permissions affect a patron's ability to see certain tabs, pages, controls, and text.
Access levels can be set up by the Destiny Administrator, a site Administrator, or both as follows:
- The Destiny Administrator can configure specific access levels for one, multiple, or all schools in the district. Site Administrators can then take control and manage the access levels at their school.
- The Destiny Administrator can define and manage the default access levels for all sites and only allow site level to assign access levels to patrons and view the permissions for each access level.
- Each site Administrator can set up and maintain access levels for their school.
Determine how you want to set up access levels for the district. If access levels will be set up similarly for each school, you might initially push them down from the district level, and then let the site/library administrator make additional customizations.
|
Note: A Destiny Administrator can manage access levels or assign a user the Product Access Levels permission, which lets them see and set the rights for other users of the selected product. |
The district users set up during installation are:
- Destiny Administrator
- District Reports User
- District Library Cataloger
- District Patron User
- District Resource Manager
The access levels set up at the site during installation are:
- Administrator
- Library Administrator
- Resource Administrator
- Teacher
- Staff
- Patron
- Guest
By default, these users are granted specific permissions.
To update permissions for an access level at a site, select Admin > Access Levels, and next to an access level, click Edit.
At the top of the page, you will see the selected access level.
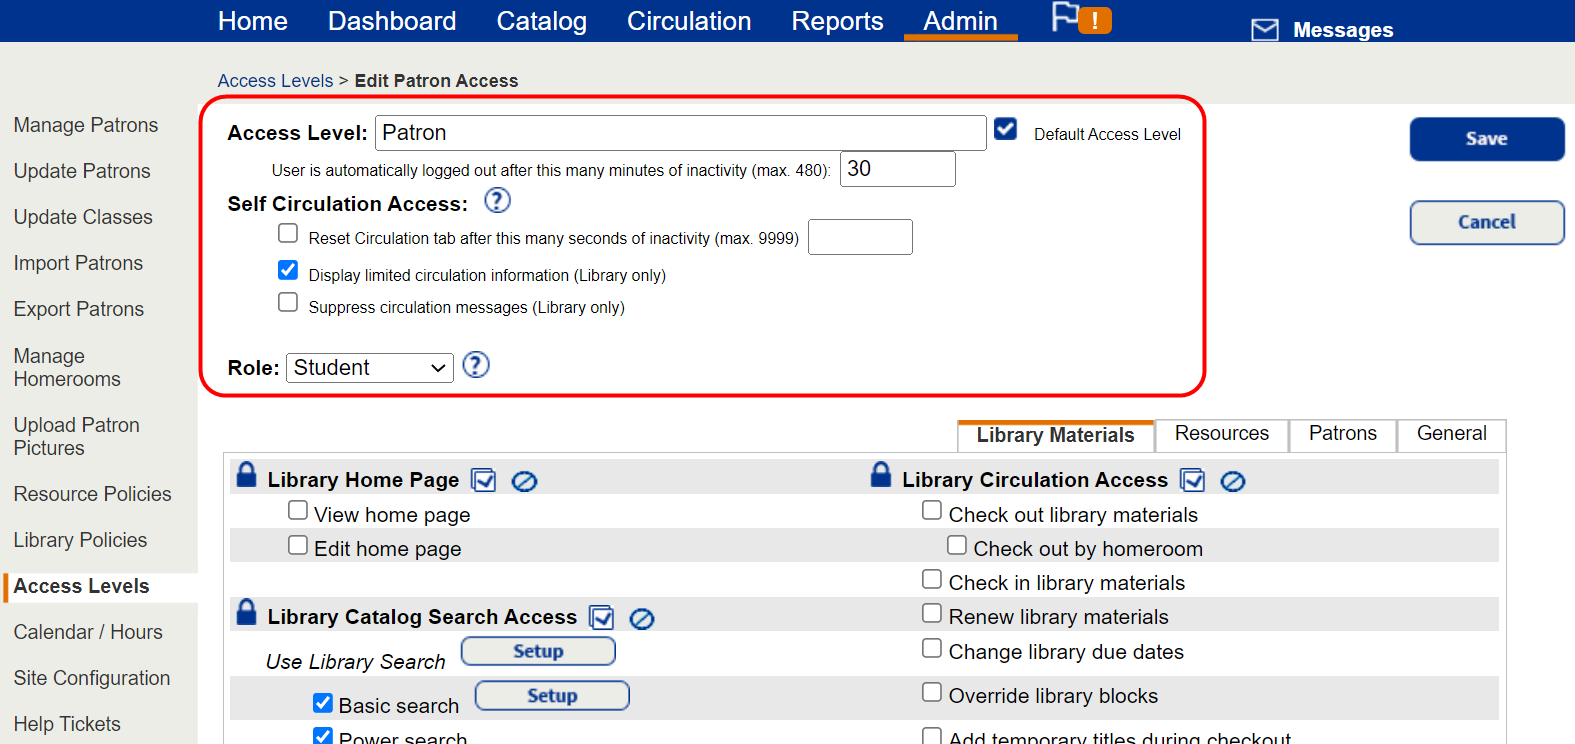
Under the Access Level field, designate how long users with that access level can be idle before Destiny will log them out. Consider the type of information users with the access level can see. If they have access to patron data, you might want the timeout to be short.
Additionally, if you use a self-checkout station, you can protect patron information and privacy by selecting to:
- Set the number of seconds of inactivity before the Circulation tab resets.
- Display limited circulation information (Library only): Only patron first name, picture, and last item checked out will show during checkout.
- Suppress circulation messages (Library only): Hold and block messages will direct patrons to talk to their librarian during checkout and checkin.
Use the Role drop-down to choose a role, which defines:
- The actions a user can perform in Collections by Destiny®.
Note: For more information, see Collections Help
- The version of Destiny Discover a user sees.
Note: For more information, see Destiny Discover Help
Edit Permissions
When you want to grant a user type different access than was originally defined, then you need to edit a permission. Any change will impact anyone assigned that access level.
|
Important: Permissions with a strikethrough indicate that only the Destiny Administrator can manage that given permission, not the Site Administrator. |
- Do one of the following:
If you want to... Then Set up access levels from the district - Log in as the Destiny Administrator.
- Select Setup > District Options.
- Next to Access Levels, click Edit.
Set up access levels from the site - Log in as a site Administrator.
- Select Admin > Access Levels.
- Next to an access level, click Edit.
- Make the changes accordingly.
- When you are done making changes, click Save.
Use the links to view permissions on the associated sub-tab:
- Permissions for Library Materials sub-tab
- Permissions for Resources sub-tab
- Permissions for Patrons sub-tab
- Permissions for General sub-tab