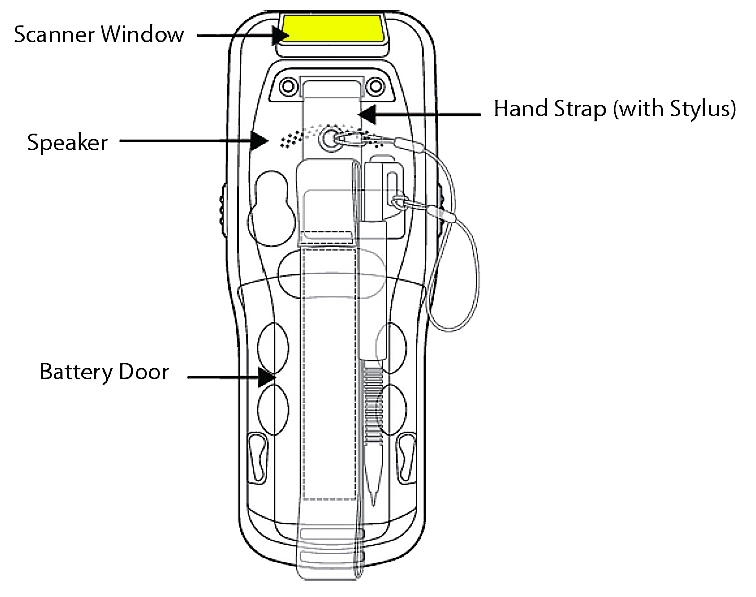
Follett 7100 Wireless Scanner
The Follett 7100™ hand-held wireless device lets you perform many circulation, inventory, and collection and patron maintenance tasks remotely.
With a wireless network, the 7100’s customized browser communicates directly with Destiny, to let you perform real-time transactions. When you are out of range of your wireless network or when the Destiny server is not available, you can use Follett Remote to collect barcode scans offline. Follett Remote records the information in data files that you later upload to your circulation system.
Use this document to set up and charge the 7100, as well as communicate with your workstation or wireless network. It includes the following sections:
- Verifying included items
- Managing the Batteries
- Features of the 7100
- Setting Up the 7100
- Communicating with the 7100
Verifying included items
If you have just received your Follett 7100, verify the carton contains the following items:
- 7100 mobile computer (the terminal)
- Main battery pack (3.7v, Li-ion)
- AC power supply
- Localized plug adapters
|
Note: Keep the original packaging in case you need to return the 7100 terminal for service. |
Managing the Batteries
After you verify all items are included, you need to insert and charge the batteries.
The 7100 has two types of battery power: the main battery pack on the back panel and the backup battery located inside the 7100. The batteries work together to prevent data loss when you use the 7100 for long periods.
The 7100 ships with the main battery pack packaged separately from the unit, so you must insert the main battery into the terminal to charge both batteries.
|
Important: You must charge both batteries to full capacity before using the 7100 for the first time. |
Inserting the main battery pack
- Release the hand strap to access the battery compartment more easily.
- Remove the battery compartment cover by turning the cover’s pins upward and lifting the cover.
- Insert the battery into the battery well with the label facing upward and the contacts facing downward.
- Replace the cover by inserting the top edge of the cover first, then the bottom. Turn the pins downward.
Note: The battery cover must be in place before booting the unit. - Replace the hand strap.
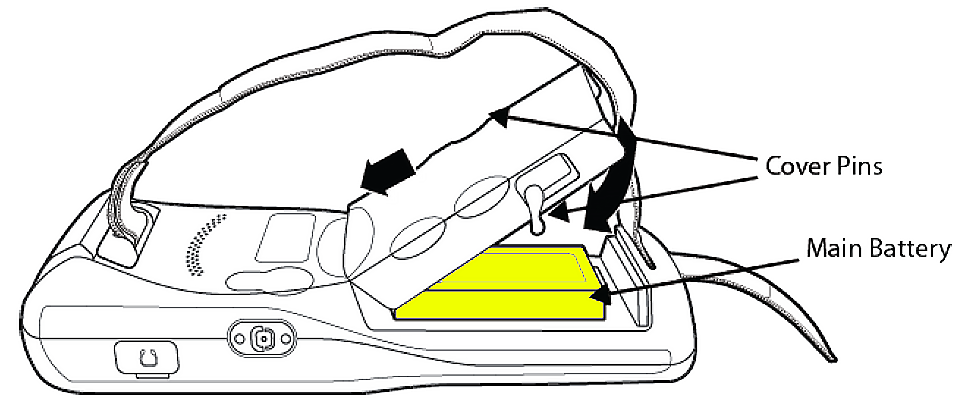
Turn the cover pins upward and remove the cover to access the battery.
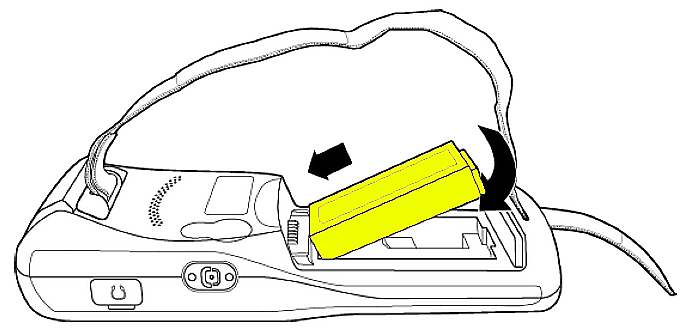
Lift the bottom of the battery first to remove it from the device.
Charging the main battery pack
The 7100 terminal ships with both the main battery pack and internal backup battery significantly discharged of power. Before initial use, charge the main battery pack with the 7100 charging cable for a minimum of 4 or 6 hours depending on your battery.
|
Important: Use only the peripherals, power cables, and power adapters from the manufacturer, as use from other manufacturers will void the warranty and may damage the 7100. |

- Attach the appropriate plug adapter to the plug of the power cable.
- Insert the plug into an appropriate power source.
- Plug the 7100 power cable into the DC Power Jack on the bottom end of the unit.
Note: If you remove the main battery pack or it discharges completely, there is a 30-minute window in which to insert a charged battery pack before the backup battery discharges completely. If your backup battery discharges completely, the contents of the RAM memory will be lost. A backup battery that is less than fully charged has a proportionally smaller window of time available.
LED Indicators Red LED On Charging Green LED On Battery is fully charged
Features of the 7100
Take a moment to become familiar with the layout of the keypad and the functions of the various keys.
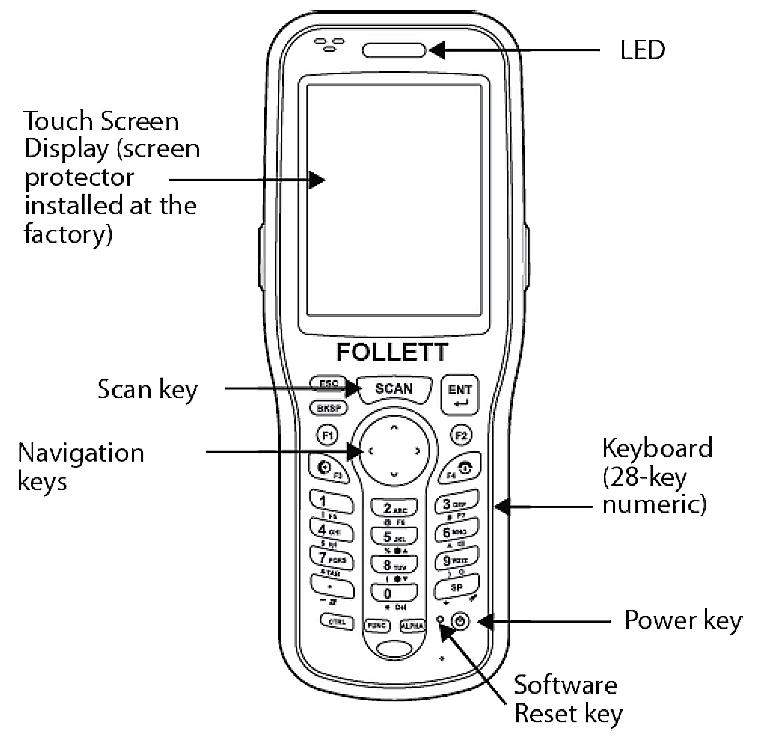

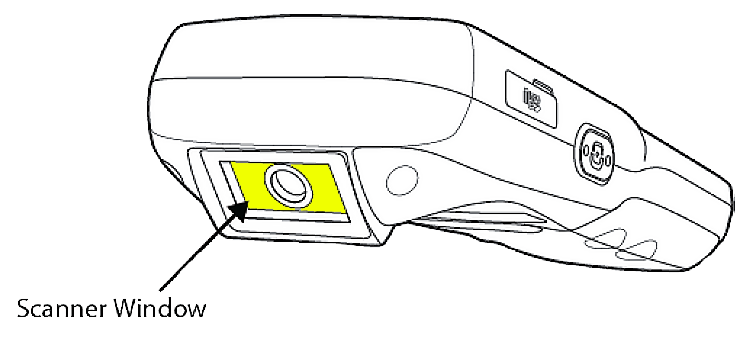
Touch screen display
The display is an LCD (Liquid Crystal Display) with a 4-wire analog resistive touch screen. The 2.8” (1/4) VGA (Video Graphic Array) features transmissive active matrix color, backlighting, and 240 x 320 resolution.
Cleaning and care of the 7100
When needed, clean the scanning lens and the LCD display with a clean, nonabrasive, lint-free cloth. You can clean the 7100 case with a damp cloth. The 7100 ships with a screen protector installed over the touch screen lens to help prevent damage that may occur due to frequent use. If you wish to remove this screen protector, do NOT do so before initial use.
Using the Follett 7100 stylus
The 7100 comes with a stylus, located in the cloth stylus slot on the back of the hand strap. Use this stylus (or your finger) to select or enter information on the touch screen display. The stylus functions like a mouse; generally, a tap is the same as a click.
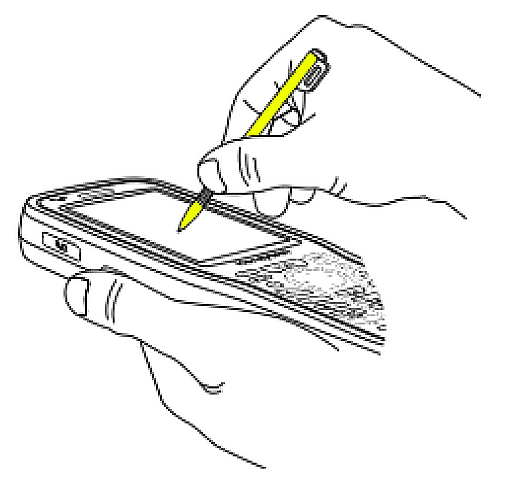
| Tap |
Tap the touch screen once to open menu items and select options. |
| Drag | Hold the stylus on the screen and drag it across the screen to select text and images. |
| Tap & hold | Tap and hold the stylus on an item and a pop-up menu appears. |
|
CAUTION: Use of objects, such as paper clips, pencils, or ink pens on the touch screen can damage the input panel and may cause damage not covered by the warranty. |
Basic keys
| Name | Function |
|---|---|
| ALPHA | Toggles keyboard between alphabetic (upper and lowercase) and numeric modes. Indicator on command bar changes accordingly. |
| BKSP (Backspace) | Performs the same function as the Backspace key on a workstation keyboard. |
| CTRL (Control) | When pressed with another key, modifies the other key to type specific characters or performs a certain function. |
| ESC (Escape) | Cancels an action. |
| ENT (Enter) | Performs the same function as the Enter key on a workstation keyboard. |
| POWER | Suspends and resumes the terminal. |
| SCAN | Activates the image engine to scan a barcode or take an image. |
| SPACE | Performs the same function as the Space bar on a workstation keyboard. |
Alphanumeric keyboard
The keyboard defaults to numeric mode. Use the ALPHA key to toggle between numeric and alphabetic modes. Pressing the ALPHA key once locks the keyboard in numeric mode, press it again to lock it in lowercase alphabetic mode, and once again to lock it in uppercase alphabetic mode. An icon on the command bar indicates the alpha/numeric status of the keyboard.
Function keys
Pressing the FUNC key with another key enables a new function on your device. For example, pressing FUNC with the 5 key increases the brightness of the screen.
| Key Combination | Function |
|---|---|
| FUNC + 1 | F5 (Launches internet access) |
| FUNC + 2 | F6 (launches Control Panel) |
| FUNC + 3 | F7 (Tab) |
| FUNC + 4 | Toggles wireless radio on and off |
| FUNC + 5 | Increases screen brightness |
| FUNC + 6 | Increases volume |
| FUNC + 7 | Same as Tab |
| FUNC + 8 | Decreases screen brightness |
| FUNC + 9 | Decreases volume |
| FUNC + . | Displays Start menu |
| FUNC + 0 | Deletes |
| FUNC + SP | Aligns the screen (Press ESC to exit.) |
| Note: Blue text below each key indicates these key combinations. |
CTRL key combinations
| Key Combination | Function |
|---|---|
| CTRL + 1 | ! |
| CTRL + 2 | @ |
| CTRL + 3 | # |
| CTRL + 4 | $ |
| CTRL + 5 | % |
| CTRL + 6 | ^ |
| CTRL + 7 | & |
| CTRL + 8 | ( |
| CTRL + 9 | ) |
| CTRL + . | - (minus) |
| CTRL + 0 | * |
| CTRL + SP | + (plus) |
| Note: Yellow text below each key indicates these key combinations. |
Program buttons
Use the Program button feature in the Control Panel to program buttons to execute different functions. The following buttons on the 7100 are preprogrammed for the listed function.
Press and hold the FUNC key and press the appropriate function key to execute the indicated function.
| Key | Function |
|---|---|
| F1 | Internet Explorer |
| F2 | |
| F3 | Scan Wedge |
| F4 | Follett Remote |
| F5 | Pocket CMD |
| F6 | Control Panel |
| F7 | Transcriber |
| Note: Follett Remote should be closed by selecting File then Exit. |
Wireless radios (wireless communication)
Follett 7100s have a 2.4 GHz 802.11b/g WLAN (Wireless Local Area Network) radio that uses DSSS (Direct Sequence Spread Spectrum) technology. The radio is interoperable with other 802.11b/g, Wi-Fi compliant products, including access points (APs), workstations via PC card adapters, and other wireless portable devices.
By default, the 802.11b/g radio is enabled after each hard reset, which means that the radio begins transmitting a signal as soon as the terminal finishes booting up. The next step is to configure the connection parameters of the radio to connect to a wireless network.
Once you configure the 7100 for your network, you can communicate wirelessly to Destiny.
Establishing a successful wireless connection depends heavily on your network infrastructure. You need specific information from your network administrator to configure the 7100 for your network.
Connecting to a wireless 802.11 b/g wireless network
The 7100 contains an integral Network manager for the on-board 802.11b/g radio.
The Wireless Radio supports the following protocols: WEP, 802.1x, LEAP, TKIP, MD5, EAP-TLS, EAP-TTLS, WPA-PSK, WPA v2.0, PEAP.
For the above protocols that support EAP authentication, the 7100 supports the following methods:
|
|
To communicate with your wireless network, you need to turn the power on to the radio and configure your WLAN settings on the 7100.
Enabling the WLAN radio driver
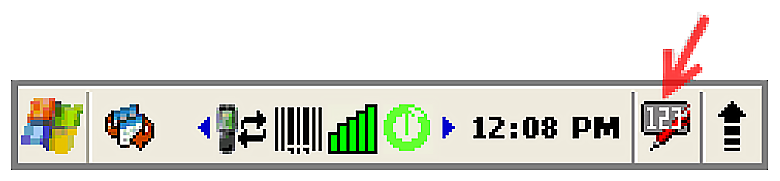
The radio driver must be enabled for the radio to transmit a signal and connect to a network. To enable to driver, tap the UP arrow in the lower right corner of the screen, or press FUNC + 4.
Configuring a wireless connection
|
Important: A cold boot of the 7100 could delete the WLAN settings. You may want to record this data in a secure place. |
- To open the network manager, tap
 in the taskbar.
 - To enable the radio, tap the up arrow and turn wireless LAN on.
- Open the Config tab and click New. (If you would rather scan for existing wireless network devices, tap Scan.)
- On the Network dialog, type in your SSID (network name).
- Select the Association Mode of your network configuration from the list.
Select To connect with None No authentication or encryption. WEP WEP encryption. IEEE 802.1X (WEP) WEP encryption and EAP authentication. WPA-Personal (PSK)
WPA2-Personal (PSK)
WPA encryption and PSK authentication. WPA-Enterprise (EAP)
WPA2-Enterprise (EAP)
WPA encryption and EAP authentication. The fields and options required by the association mode, encryption, and EAP methods appear in the Network Window after each is selected.
- If required by the association mode, select the Encryption method.
- If required by the association mode, select the EAP Method.
- If required or desired, enter keys or passwords.
- (Hide the Input Panel, if open) Tap OK at the bottom. Back on the Config tab, your SSID now appears in the list.
All server-assigned IP addresses use Dynamic Host Configuration Protocol (DHCP).
Activating a wireless connection
On the Config tab, select the network in the list and tap Activate. The 7100 attempts to connect to the network according to the parameters you entered above.
| Note: The 7100 will not attempt to connect until you tap Activate. The Config tab stores all the configurations you have created in the list but activates only one configuration at a time. |
[x] appears next to the activated configuration.
To switch connections, simply select it on the Config tab and tap Activate.
The Status tab appears, displaying the connection status.
The radio status icon in the taskbar changes to indicate the status:
| Color | Meaning | Status tab status |
|---|---|---|
|
Gray
|
The radio is disabled, idle, not connecting. | NO RADIO, RADIO OFF, DISCONNECTED, INACTIVE |
|
Yellow
|
The connection is:
|
ASSOCIATING AUTHENTICATING |
|
Red
|
Authentication failed and the connection failed as a result. | ASSOCIATED but not authenticated |
|
Green
|
The connection is authenticated with a valid DHCP address. | COMPLETE |


To configure the IP address:
- Open Internet Explorer and select View > Internet Options from the menu.
- Set your Start page to the IP address of your Destiny application.
Connecting to a workstation through a cable
To allow your workstation and the 7100 to communicate through a cable, you need the correct cable and Microsoft ActiveSync® software.
You need the following hardware:
- 7100 communication cable or a HomeBase
The USB cable allows the Follett 7100 to communicate with a workstation or to a network through a USB hub. The 7100 supports fullspeed USB communication (USB 1.1). Maximum data transfer rate is 12 Mbps. As shipped, the 7100 defaults to USB communication. - 7100 power cable from the manufacturer.
- A workstation running one of the following operating systems: Windows ® XP; Windows 2000; Windows Me; Windows NT® (4.0 SP6 or higher); or Windows 98 Second Edition.
You need the following software:
- Windows Mobile Device Center 6.1 (or higher) installed and configured on the workstation for Windows Vista or Windows 7.
If ActiveSync/Mobile Device Center is not installed on your host workstation, you can download and install the most current version from www.microsoft.com. - ActiveSync 4.1 (or higher) installed on the Windows XP workstation and configured on the 7100. (We ship Follett 7100s with ActiveSync already installed.)
- Mobile Device Center 6.1 (or higher) installed on Windows Vista or Windows 7 and ActiveSync configured on the 7100.
You must set up ActiveSync on your workstation before you connect your 7100 for the first time.
Setting up the workstation
Once you have installed ActiveSync on the workstation, you must configure it for Windows XP:
- Double click the ActiveSync icon
 in the system tray.
 - In the Microsoft ActiveSync application, select File > Connection Settings.
- Select the Allow USB connections checkbox:
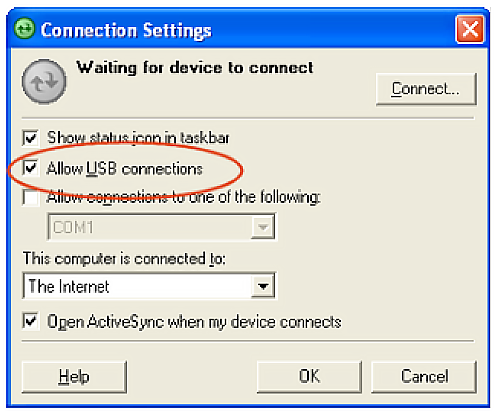
- Click OK to close Connections settings, and then select File > Close to close the ActiveSync application.
Once you have installed Mobile Device Center on Windows Vista or Windows 7, you must configure it:
- Double click the ActiveSync icon in the system tray.
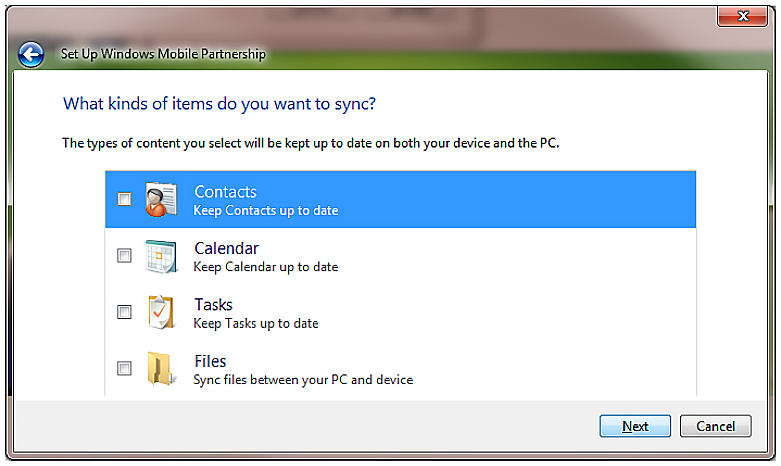
- In the Microsoft Mobile Device Center application, select Set up your device.
- In the Set Up Windows Mobile Partnership pop-up, select the second option, No, I want a synchronize with two computers, and click Next.

- Leave everything unchecked on the What kinds of items do you want to sync? screen and click Next.
- Name your device and leave the first option checked (Merge the existing items on the device with the items on the desktop). Select Set Up.
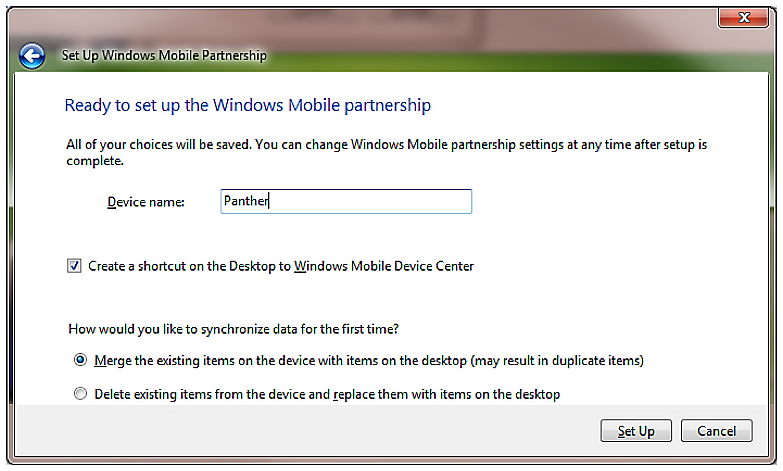
Setup will finish and the partnership will be established.
Setting up the 7100
As shipped, the 7100 defaults to USB communication with your workstation.
To verify or change the default setting:
- Tap
 (Start) > Settings > Control Panel > PC Connection.
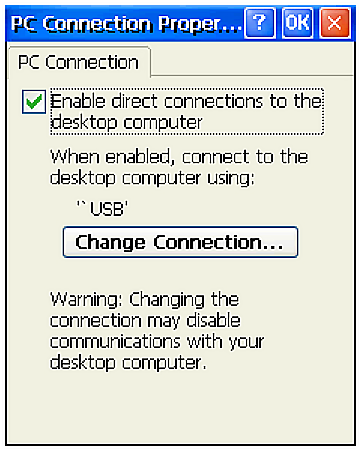
- Tap Change Connection to change the current settings.
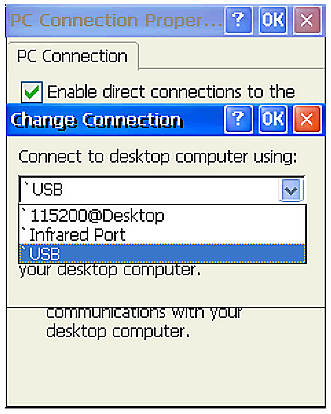
Connection Options Select an option to... 115200@Desktop Establish an RS-232 connection. Infrared Port Establish an ActiveSync connection via the IrDA Port. USB Establish a USB connection. - Double tap OK to close PC Connection, and tap OK again to close PC Connection Properties.
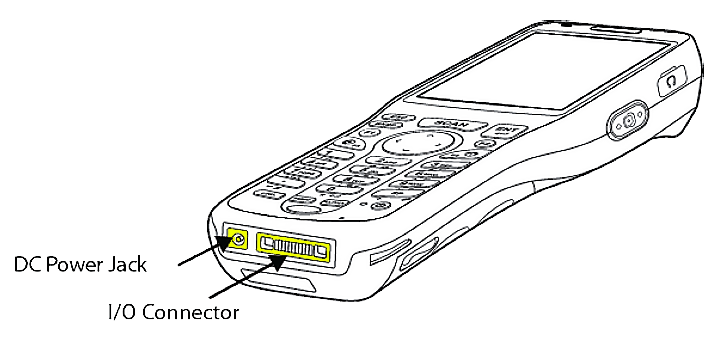
Connecting the USB cable
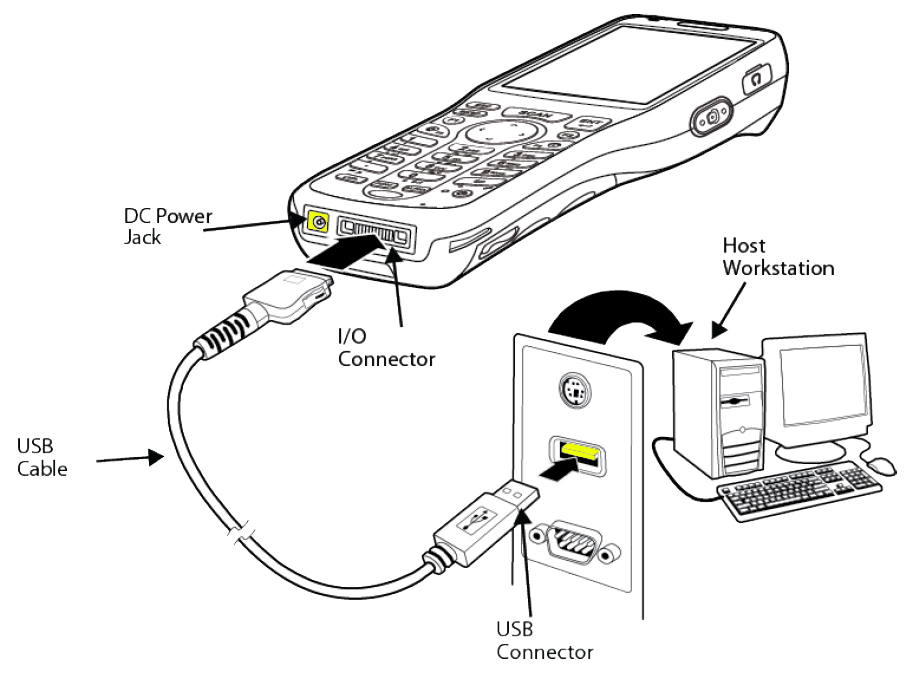
Connect the USB cable to the I/O connector on the 7100 and to a USB port on the workstation.
This is a communication-only cable unless you plug the power cable into the power port.
Connecting the power cable
The Power Port on the back end of the USB connector fits the power cable that comes with each Follett 7100. To charge the device while communicating, connect the power cable to the Power Port.
Communicating with the 7100
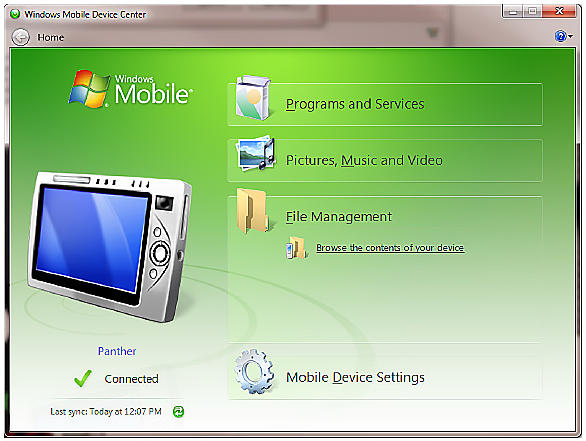
After setting up both the workstation and the 7100, an ActiveSync connection should be automatic.
When you connect the 7100 to a communication peripheral, such as the communication cable, the 7100 opens ActiveSync to establish a connection automatically.
Uploading Follett Remote files from the 7100 to your workstation
ActiveSync on Windows XP
When you have connected the 7100 to the workstation, ActiveSync should open automatically. If not, open ActiveSync on the workstation by double clicking the ActiveSync icon in the system tray.
- Click Explore on its toolbar. The Mobile Device folder opens in Windows Explorer.

- Locate and transfer your Follett Remote files by dragging and dropping—or copying and pasting—them to a location on your workstation, just as you would when moving any files between folders.
You will find your Follett Remote files in \IPSM\Follett Remote.

Uploading the files from the workstation to your application
Once you have moved your Follett Remote files to your workstation, you can upload them to your application. In Destiny, once you regain your wireless connection, you can upload the files through the browser.
Mobile Device Center on Windows Vista or Windows 7
When you have connected the 7100 to the workstation, Mobile Device Center should open automatically. If not, open ActiveSync on the workstation by double clicking the ActiveSync icon in the system tray.
- Under the File Management option, select Browse the contents of your device.
- A Windows Explorer screen opens and displays the Contents of the device.
- Navigate to \IPSM\Follett Remote\ to locate all your Follett remote files.
Uploading to Destiny
You can upload Follett Remote data files from several pages in Destiny.
If you have transferred the Follett Remote files to your workstation:
- Open the appropriate screen and select your options.
- To locate and select your barcode file, click Browse.
- To start the processing, click the Upload, Update, or Run Report button at the bottom of the screen (depending on the screen).
- Check the job summary in Job Manager in the Back Office tab to review any exceptions.
If you are uploading the Follett Remote files wirelessly:
- After logging in, tap Upload File.
- On the Upload File page, select the type of file you are uploading.
- For offline circulation, verify or change the Transaction Date.
For inventory, select the one you are working on.
In Textbook Manager, select your Location.
For textbook or asset transfers, select the destination site. - Tap Browse to locate and select your Follett Remote file in the \IPSM\ Follett Remote folder.
- Tap Upload.
Once you see the message, Your uploaded file has been sent to the Job Manager, you can continue with other tasks. You can review the exceptions report or Job Summary after a file is processed.
When you no longer need uploaded files, make sure to delete them from both your workstation and your 7100.
Problem Resolution
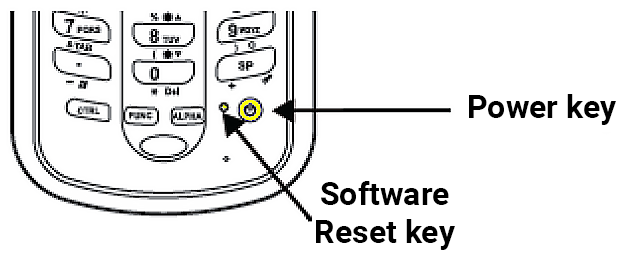
If your 7100 exhibits erratic operation or does not seem to be functioning correctly, you may wish to try a warm reboot by using the stylus to press the small recessed Software Reset Key next to the Power key. If this still does not correct the problem, you can try a cold boot by pressing the reset button and then pressing and holding the Power key.
Click here to download the pdf.